When designing for a client, regardless of the department you’re working at, you have to know well who he is and what he needs. Even the best specialists can’t determine that arbitrarily, taking into account only their own competencies and experiences. Thus, it’s crucial to use research tools.
Depending on its budget and the time needed to complete a project, choose the methodology that will allow you to design certain solutions in the most efficient way. The technique that is relatively affordable and doesn’t require a lot of time, while allowing you to collect valuable information, are workshops based on empathy map templates and personas designed on their basis.
To design the so-called personas, that is models of potential users, you can use a number of techniques. Empathy maps are a tool that allows you to create imagined client characters. The personas which arise on the basis of such maps are a valuable and useful source of information about the people you’re designing for.
Map – when and for whom?
This method of getting to know preferences and needs is usually utilized with people who have some knowledge about the end-user. Thus, among the people we can invite to create empathy maps with, are those who deal directly with customer service: sales reps, advisors, consultants, etc.
If you have some extra information regarding the users, for example from previously run quality surveys, it’s good to utilize them to expand the map. The results of individual interviews or ethnographic research are a valuable source of data, that the employees of an organization might not be fully aware of.
A workshop should take place before the entire project cycle, so that you can generate ideas for various solutions on the basis of the information obtained during the course of a workshop.

Where do you start?
The first step will be to establish, together with the representatives of a particular organization, our target and most important groups of users, stemming from the segmentation of clients. You need to know what are the key personas you’re going to design for. One particular empathy map will be excellent for a relatively homogeneous group of potential recipients, that you might work with in the future. This is why you need to develop a separate template for every persona.
What’s next?
Select a distraction-free spot, where the participants will be able to work comfortably. Provide tables for each team to create their map without interfering with others. Print out or draw large templates containing areas that are included in an empathy map, equip the subjects with colorful markers and post-its. Start the workshops, keeping in mind the most important elements.
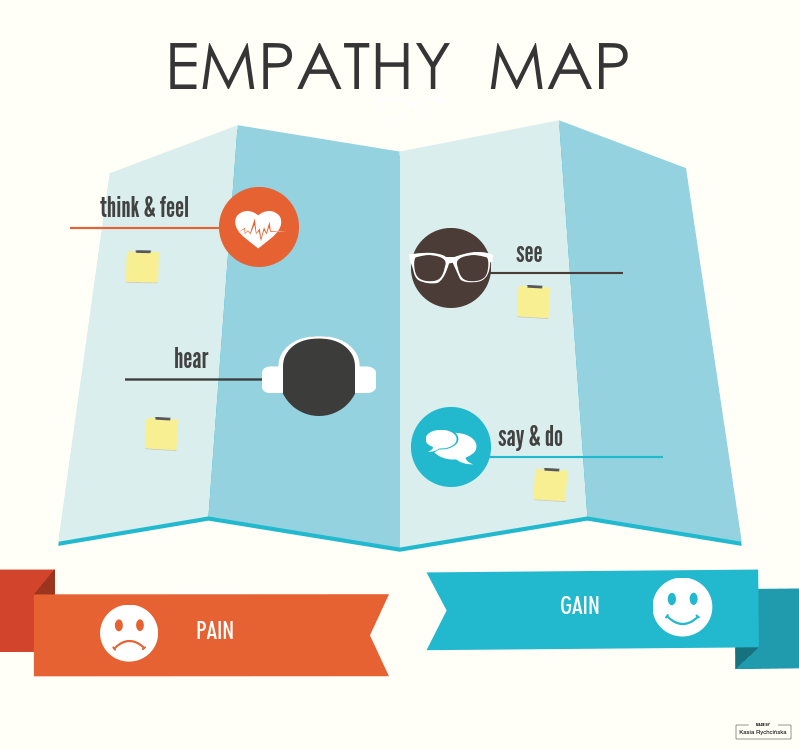
Empathy Map – Key elements
A step by step workshops guide:
1. Assign the participants to teams according to pre-set criteria.
2. Provide each group with at least one map sheet and tools to fill it out.
3. Allow the participants to customize the person embodying the map. Let them choose its name, sex, age and establish what’s its life situation like – single or married, hobbies and priorities. This will help visualize the potential user in more details. Depending on who you’re doing the research for, you can also ask contextual questions like: if the person represented by the map has a pet, does it move around town using public transport, etc. Think about them in advance, before you take action, but don’t ignore the spontaneous ideas that arise among the group.
4. Once every empathy map has been dedicated to a “specific” person, start moderating the process of filling out the particular areas of the map. Let’s say our model person is X, because on each empathy map he’ll be someone else.
– X Thinks and says
Here, the participants write down what the imaginary character feels and says in the context of a particular issue. What his emotional approach and internal beliefs are. This isn’t the place for his official declarations but rather for his deep-down feelings and real thoughts.
– X Hears
What messages from the outside world reach him, what does his friends and family say, what does he hear on the radio, at school, at work, in the streets.
– X Sees
This area reflects all the images and visual messages that reach the person represented by the map. What does he see in his environment, what does he pay attention to, how does he perceive specific products/services and their brands.
– X Does and says
Here, you put down everything that relates to the actual behavior of the user, what he actually does (even if it differs from the ‘Thinks and feels area’). How he behaves in social situations, what’s his attitude towards a certain issue. What he does on a daily basis, what are his passions and habits.
– X’s fears
This field is a place for all the fears and frustrations that the character represented by the map may feel. What he is afraid of and what he is worried about.
– X’s benefits
The last area is devoted to all the benefits that the user can draw from your product/service. The success that he can achieve by using what the organization offers him. This is also the place for aspirations and ambitions of the potential client.
Personas
After filling out all the areas of the map you get a comprehensive information about the users. It’s worth it to transfer this information to the model of the aforementioned personas. In order to do that, you can use ready-made templates or create them on your own.
Each persona should include the basic elements reflecting the map’s areas, as well as additional, specific information about the imagined user. Every map character, when turning into a persona, should represent a person which, thanks to proper visualization and humanization, will be easier for you to understand during the design process.
Elements of a template
A persona doesn’t always have to be a perfect reflection of an empathy map, however, it’s crucial not to ignore much of the valuable information obtained during the workshops.
When creating a persona, describe it in detail. If during the workshops the participants didn’t specify the sex or age of a potential user, try to set these variables yourself. It’s also good to visualize the person by adding a photo or some other picture. Add a maxim, short bio, place of residence, family situation and other information that may be important in the context of the project.
Imagine that this is the person you want to create a particular solution for. Take a minute to think about what would you like to know about this person in order to meet its needs as best as possible. Utilize your research results and voila!

Final word
So, you’ve conducted the workshops, filled out the maps, you got the personas. What’s next? From now on, start to refer to them in the process of executing the project. It’s best to print them out and pin them at your desk or at the place where you’re working on the creation. Remember that you’re always designing for the weakest link and even the most show-off solution won’t be optimal if you won’t consider the limitations and real needs of its users.
You might be interested in: Ecommerce website solutions

Published February 23, 2015